
I am grateful for the protection afforded us by the armor of God, that You Lord, are our defense.
For our struggle is not against flesh and blood, but against the rulers, against the powers, against the world forces of this darkness, against the spiritual forces of wickedness in the heavenly places. Therefore, take up the full armor of God, so that you will be able to resist in the evil day, and having done everything, to stand firm. – Ephesians 6:12-13
Lord is my light and my salvation; Whom shall I fear? The Lord is the defense of my life; Whom shall I dread? – Psalm 27:1
In my last post, I offered to give a description of the process of making a doll bed (crib) for my grand daughter, so here goes…
Her doll is nearly two feet tall, so that sets the basic scale for the project. You might notice that the mattress is a queen-size pillow. The head- and foot-boards are 1″x2″ oak assembled with mortise and tenon joints. The inserts are 1/8″ oak plywood. The basic tools are a table saw (including a dado blade set used to cut the tenons), a plunge router for making the mortises, and for rabbiting the grooves to hold the plywood. I also used a drill press to make holes for dowels used in the crib rails
The more non-obvious part of the process comprises making and using a jig to guide the router, so that is what I will concentrate on here.

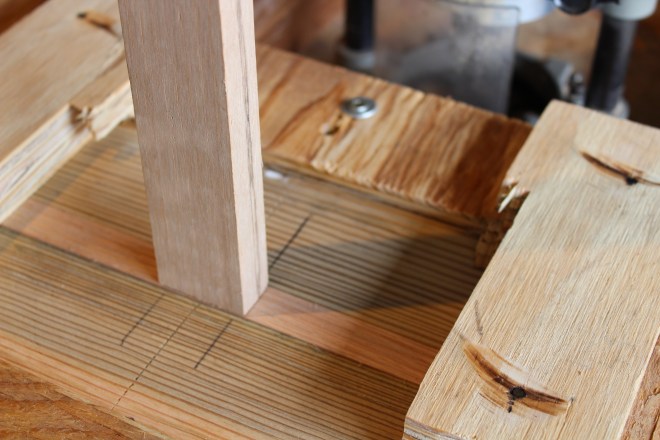
The mortising jig has the simple function of guiding the router so that you can end up with mortises in the center of the edge of the 1×2 bed posts. Centering is critical, so that the cross members align with the upright ones. In the picture above, you can see the workpiece clamped in between two scrap lengths of 2×8 lumber that I had laying around. On top of those are other scrap pieces carefully aligned and screwed down to limit the travel of the router. There is no vertical movement, and only enough freedom for horizontal movement to get the correct width of the mortise. The upper and side limits are only attached to the top 2×8, so that when the clamps are loosened, the work piece can be moved or a new one inserted.

In the second photo, you can see the router in position in the jig, and the limited freedom to move sideways. It always takes me some trial and error on some scrap pieces to get the jig-fine tuned to give a good result.
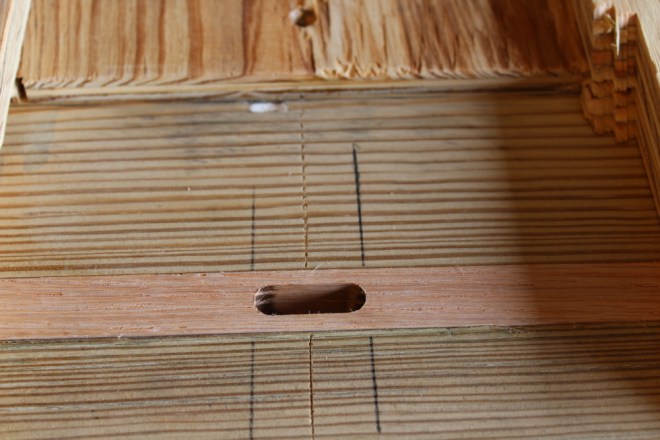
This third photo shows the finished mortise. Using a 3/8″ router bit gives the right proportion for 3/4″ stock. Note the alignment marks on the jig. These are needed to get the vertical spacing right on each post when clamping the workpiece. Many passes are made with the router, each slightly increasing the depth. As long as the jig is a snug fit, this process will give a nice mortise with a snug fit and avoid overheating the router bit.

The cross pieces have a tenon cut to fit into the mortises on the bed posts. I did this cross-cut work with a dado blade in my table saw. (A dado blade set consists of two saw blades separated by a group of “chippers” that remove the material between the two blades.) I used the full 3/4″ width of my blade to minimize the number of passes. The material removed is controlled by the height of the blade, set to exactly 3/16″, leaving a 3/8″ thick tenon. Passing through the saw has to be done carefully to get all four cuts to align exactly. I clamp a block to my guide fence to serve as a starting guide for the length of the tenon. This is much safer than allowing the end of the tenon to drag along the fence while going through the blade. A little sanding is all that is required to get the square tenon to fit in the round mortise made by the router bit.
I took the picture above to demonstrate the fit while the bed post was still in the mortising jig.
I will post the remainder next time.

Thank you very much, how fascinating. My grandfather worked with wood and some of my fondest memories take place in his workshop. To this day when I smell fresh cut lumber I am transported into the past. ☺️
LikeLiked by 1 person
I am pleased that you are enjoying this excursion into my workshop. Thanks for reading!
LikeLiked by 1 person